Telephone: 408-839-5569
Email: (Click Here) Andrew@JaguarSpecialties.com
Last Update 7-2-24
XJ6 and XJS LS Engine Conversions- LS1 LS2 LS3 LS6 LS7Note to readers: Kits are now available for LS engine conversions into 70-87 XJ6 (sedan and coupe) and 76-96 XJS cars. These articles are here to give you a flavor for what's involved in doing an LS engine conversion on your Jaguar, and I will be adding more on the different aspects of the projects from time to time. After driving my (finished) LS1-Jaguars for a while now, I can attest that the power, torque, flexibilty, and smooth reving of these engines are a perfect match these cars. This is a fantastic conversion opportunity any XJ6 or XJS, and with the information in our conversion manual, and the kit and supporting parts, a Jag owner could do this conversion on his own car easily. I hope you enjoy the different installments- please feel free to Email or call with questions, etc.,.
Part 4
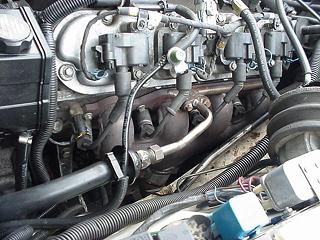
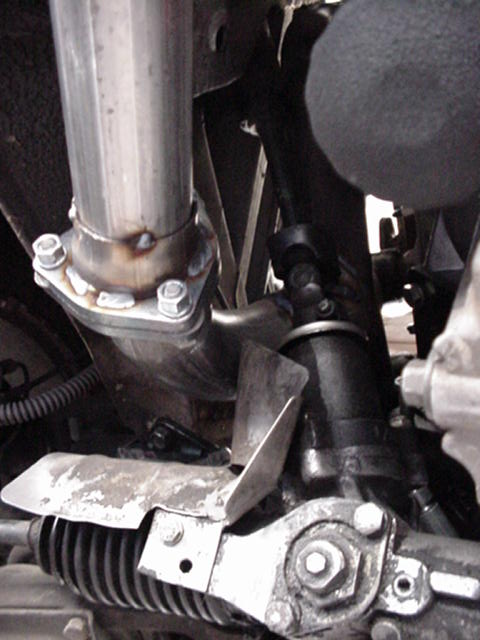
Exhaust System Moving forward on the LS1 engine conversion, I began to look into another problem area that could potentially add high cost to the project- the exhaust system. Although I wasn’t worried about the bulk of the exhaust- the sections rearward of the engine would probably be very similar if not the same as on the earlier conversions- the exhaust manifolds themselves could be a problem. My real objective here, in line with keeping costs reasonable, was to find some original GM exhaust manifolds that would work with the Jag chassis. Custom headers were always an option, and that was what had been used on the several (handbuilt) Jaguar-LS conversions to date. But there are 2 major drawbacks with them: 1) cost- even if successful prototype units were made, it is unlikely that the volume to be made in production would bring costs to a reasonable level (below say $600/pair), and, 2) for California owners, with our emissions regulations, these headers would never be legal for a street driven car (not without hugely expensive certification testing, again far outside a reasonable level for this small business). And as it turns out, even the off-the-shelf headers for the LS that are available (and would be ok the 49 other states and maybe even California) wouldn’t fit the Jag chassis. So there really wasn’t anything available from the aftermarket that would work. So the search began for a style OE LS exhaust manifolds that would fit the Jag chassis. As on earlier conversions, the key requirement was that the manifold drop straight down and not along the block “V”, from the center of the head, and not at the end. That requirement narrowed it way down as most GM designs exited towards the rear of the block- not what I needed. I was hoping that if the right design could be located it would fit both chassis- XJ6 and XJS. It was a great goal, but didn’t quote work out. The added width of the LS engine, and the relatively tight XJS engine compartment made 2 different manifold designs the only solution. But in both cases OE GM units were located and they fit. The XJ6/XJ6C cars could use a very common cast iron (and as it turns out, high flow) unit, and the fit was pretty good. In fact, a simple alternative method of installing these manifolds helped work around the age-old Jaguar V8 conversion problem of exhaust clearance around the steering rack/steering shaft. On the XJS, I had to get more creative. For most of the early (non-truck) installations of LS engines, GM used a new type of exhaust manifold that was actually stamped from stainless steel sheet in sections, and then welded together into a finished unit. Since these were welded, and not cast, they could be easily modified with welding, new piping, etc.,. And that’s how it actually worked out- a different set of (formed and welded) OE GM manifolds were used for the XJS install, and worked very well. The right side dropped right in place with no modifications, and on the left side, some modification of the headpipe connection area resulted in an acceptable fit (Note- the XJS style manifolds would also fit the XJ6 install, but since the cast iron manifolds fit the XJ6 without modifications, they were chosen for that chassis). In both cases, the best part is that from above, where any emissions inspector might be looking, the manifolds in either car look stock (because they are) so they’d be legal to use anywhere, even in California. Attached are some pics of the finished manifold installation in the XJS- you can see that they are a bit of a tight fit towards the rear of the engine compartment, but they have clearance, and worked fine. The third pic was taken from below the driver side (during the exhaust fab) where you can see the headpipe snaking around the steering rack.
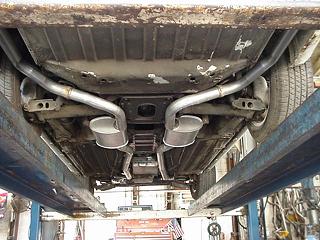
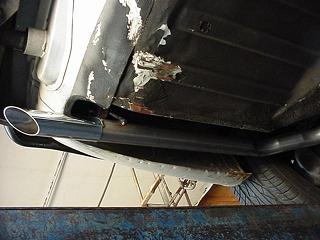
Once the exhaust manifold questions were answered, the rest of the exhaust work could be tackled, and it was fairly straightforward, as expected. For the XJS, the entire exhaust is 2 ˝” tubing, including the headpipes into stock Camaro LS1 catalytic converters (the only ones that would be legal for California on an LS1- a long story), then straight back to large turbo mufflers ahead of the rear axle, and finally, the pipes continue rearward, under the center of the rear suspension, and then flaring out to the stock exit locations. Attached are some pics of the complete exhaust install on the XJS (look at the exhaust, not the car- it’s a test mule, a rusty, banged up piece of junk)
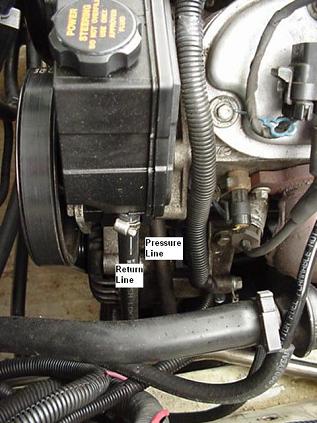
Power Steering As far as the power steering goes, I wasn’t really expecting any major issues for these conversions. The accessory drive I am using is Camaro based (as that’s the most common) and I wanted to stay with a factory parts- no aftermarket pulleys, brackets, etc.,. Also, the Camaro parts are abount the lowest overall relative to the engine, which is helpful for the low hoodline of the XJS and XJ6. The pump is mounted on the top left which is convenient for us as the steering rack hose inputs, so the overall length of the hose run will be short- much shorter than the LT1 conversions. Unlike the LT1’s, the Camaro power steering pump uses an integral reservoir, not remote. Overall, the fabrication of the LS1-Jaguar power steering hose set was pretty straightforward. The only odd part about it was the somewhat tight area that the high pressure hose runs through coming out of the pump and going down alongside the water pump and past the outside of the alternator. On this line, GM used a somewhat complicated section of bent steel tubing on the pump end, and then transitioned to hose down where there is more clearance (probably done to keep hose from getting rubbed/frayed in this tight area). I duplicated this design in the new hose-a copycat upper section was formed from steel tubing, mated to a properly rated length of pressure hose, and then the proper end to connect to the Jag rack. The return line on the LS1 conversion was a lower (pressure) rated section of hose with the correct Jaguar end (at the rack), and then routed up to the return fitting on the power steering reservoir. To keep things neat underneath, both hoses run from the steering rack tower, forward (between the block and the engine mount riser, up past the alternator, and then to the power steering pump. Once the hoses were installed and the system filled, all worked very well. The steering did not feel overboosted, and there were no issues. Overall feel was about the same as on the LT1 conversions. Side note- an option on later Camaro LS1 cars was a separate power steering cooler in the return line (I think this was part of some special performance suspension option for the cars). This cooler is a water/oil deal, using engine coolant to reduce power steering fluid temps, and is mounted in the upper radiator hose. I had read good and bad things about the cooler on the Camaro/LSx web pages, so I decided not to use it here and see how things go. So far no problem. Attached are some pics of the prototype high pressure line and the final production piece (with that crazy end at the pump), and the lines as the pass the alternator and go to the pump (the pressure line goes up between the block and the pump).
AC System The AC system on these LS-Jag conversions is fairly simple and handled very much the same way we did the AC on the LT1-XJSC conversion elsewhere on the website- using mostly OE GM components. A stock GM AC condenser is used in its stock position on the front of the radiator. Different than the LS1's original installation, we use a stock GM (variable displacement) compressor with the Jag thermostatic expansion valve system (the original GM LS installation used an accumulator/orifice tube, not a thermostatic expansion valve) . The conversion system works very well- the additional efficiency of the GM dual pass condenser makes for a very cold output in the car.
|